
One of my favourite things about this time of year is fairy lights! I wanted to make a wreath that would show off some pretty copper fairy lights that I got from Hobbycraft. Keep reading to find out how to make your own really cheap and easy Fairy Light Twig Star Wreath.
You will need:
- A bundle of long straight twigs
- Secateurs
- Ruler
- Hot glue gun
- 1 meter of ribbon (about 5cm wide)
- An elastic band
- Battery powered copper string lights
Step 1:
 Firstly you will need to collect (or buy!) a bundle of fairly straight twigs. Using the secateurs, cut them into lengths of about 25cm. You will need 16 twigs that are 25cm long. If you have any leftover twigs why not try making a Mason Jar Tree Terrarium?
Step 2:
 Separate your twigs into four bundles of four twigs. Each bundle will be glued into a square using your hot glue gun. I forgot to photograph this step, but you want the ends of the twigs to overlap slightly like in the diagram above! Do this with all the bundles so that you are left with four twig squares.
Step 3:
 Take two of your twig squares and lay one of them on top of the other to make a diamond shape. Using your glue gun, put a blob of glue at every point where the twigs meet. Do the same with the other two twig squares.
Step 4:
 Lay one of your twig diamonds over the other and twist and adjust them until you’re happy with the shape. I wanted mine to look like a layered star. Once again, use your glue gun to glue down all the points where the twigs meet. It should now feel quite solid.
Step 5:

This next step is easier to do when your fairy lights are lit up, so turn them on and separate out the eight strings. Put the battery pack at the top of your twig star wreath and start to wrap the strings around the twigs. Wrap four strings around the right side of the wreath and four around the left side, making sure that there are lights all the way around the wreath.
Step 6:
 This last step is a little tricky to explain in writing, but it’s just about covering the battery pack and creating a hanging loop. Take your ribbon and fold it in half. Insert it in between the twigs at the top of the wreath so that one double layer is underneath the battery pack, and one on top.
If there is any spare wire, wrap it around the battery pack and using the elastic band, tie the battery pack to the bottom double layer of ribbon (this should be the one with the fold at the top, not the two separate ends)
Next, tie a knot using both double layers of ribbon just above the battery pack. Using the two loose ends of ribbon, tie a big bow that will sit over the battery pack, helping to cover it even more. You should have a big loop of ribbon above the bow which you can use to hang your wreath.
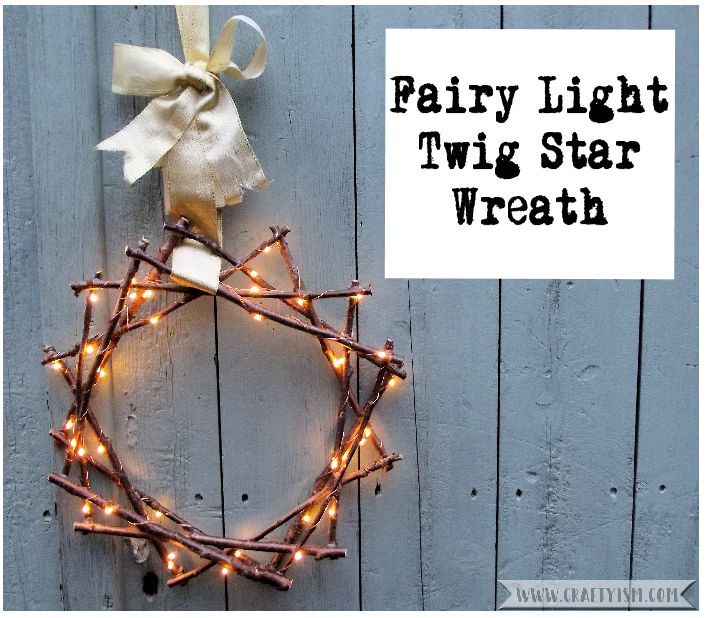
 And you’ve finished your very cheap but beautiful Fairy Light Twig Star Wreath!
Use the big ribbon loop to hang it and reach under the bow for the switch to turn on the sparkly lights. This looks lovely and rustic in the day but even better in the evening when you get the full effect of the copper wire fairy lights.
Of course this is just an idea for inspiration. You could make the twigs into any shape you like. Let me know if you have a go at making this Fairy Light Twig Star Wreath, I’d love to see a photo!
This blog post contains sponsored content, affiliate or referral links which may reward me in the event of a subscription or sale. I use these funds to feed my cat and buy more craft stuff. My cat and I thank you! For more information click here.

One thought on “How to tutorial – Fairy Light Twig Star Wreath”